Tac MTN Rifle Case Overview + Setup InstructionsUpdated 5 months ago
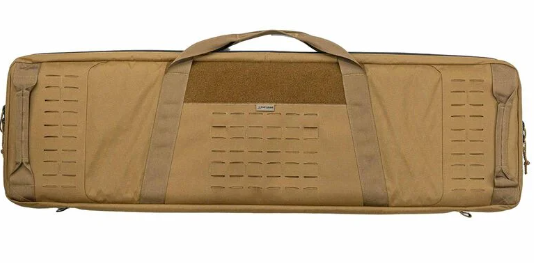
The FHF Gear Tac Mountain Rifle Case is built to provide rugged protection for your long guns while maintaining a sleek, modular design. Whether you're traveling by air, on the road, or heading into the backcountry, this case offers customizable storage, superior durability, and versatile carry options to suit your needs.
Key Features:
- Multiple Sizes & Colors: Available in 35”, 42”, and 50” sizes. Choose from Coyote/Ranger Green or Full Coyote.
- Hard Case Compatibility: Designed to fit inside select Pelican, Plano, and SKB hard cases for extra protection during airline travel.
- Water-Resistant Construction: Made from waterproof X-Pac material with #10 waterproof zippers for superior weather resistance.
- Floatable Marine-Grade Foam: 1-inch foam padding on both sides helps protect your rifle while adding buoyancy in wet environments.
- Laser-Cut MOLLE Panels: Allows for the attachment of accessories like munitions pouches or other modular gear.
- Multiple Grab Handles: Located on both ends and sides for easy access from a truck bed or storage area.
- Admin Pouch: Zippered compartment for storing paperwork, tools, or other small essentials.
- Lay-Flat Design: Unzips fully to function as a shooting mat or workstation.
- Soft Veltex Lining: Smooth interior fabric protects your firearm while allowing for hook-and-loop accessory attachments.
Included Accessories:
Weapon Tie-Downs:
- Two Velcro-backed tie-downs with daisy chain webbing and adjustable cord locks.
- Secure rifles in vertical, horizontal, or angled positions.
- Can be used to mount MOLLE-backed accessories inside the case.
Vehicle Attachment Kit:
- Enables horizontal or vertical mounting in a vehicle, side-by-side, or boat.
- Includes four adjustable straps with buckle attachments for a secure fit.
- Provides easy access to your firearm while keeping it secure during transport.
Backpack Straps:
- Attachable with Gated G-hooks and a quick-adjust loop for fast customization.
- Converts the rifle case into a backpack-style carry system—ideal for long walks to the range.
- Also allows for vertical mounting behind a vehicle’s driver or passenger seat.
Tac MTN Rifle Case Setup Instructions
Rifle Case Setup Instructions
Installing Weapon Tie-Downs
- Open the Velcro-backed tie-downs and position them inside the case.
- Wrap the adjustable cord around your firearm and tighten with the draw lock.
- Secure the tie-downs to the Veltex liner in your desired orientation (vertical, horizontal, or angled).
- For MOLLE-backed accessories, remove the cord and use the daisy chain webbing for attachment.
Using the Vehicle Attachment Kit
- Attach the adjustable straps to your desired mounting location (vehicle, UTV, boat).
- Thread the webbing loop through the female buckle on the rifle case.
- Secure the male buckle and tighten as needed.
- Adjust for preferred positioning—mount horizontally or vertically based on your setup.
Attaching the Backpack Straps
- Locate the daisy chain webbing on the side of the rifle case.
- Attach the Gated G-hooks to the daisy chain loops.
- Adjust the quick-adjust loops for a comfortable fit.
- Use for hands-free transport or vertical vehicle mounting.
Vehicle Attachment Kit Setup Instructions
What’s Included in the Kit:
- 4 adjustable straps with:
- Sewn webbing loop on one end
- Adjustable auto-lock male buckle
- Web-mounted female buckle
- Webbing adapter for MOLLE or daisy chain attachment
Step 1: Attaching the Straps to Your Vehicle
- Locate the sewn webbing loop on each strap.
- Wrap the webbing looparound a secure attachment point, such as:
- Headrest supports (for vehicles)
- UTV roll cage
- Boat grab bars
- Thread the male buckle through the webbing loop and pull it tight to secure.
- Repeat this process for both ends of the rifle case. Position one strap on each end for optimal support.
- Attach the remaining two straps toward the center of the case for even weight distribution.
Pro Tip: Position the outer straps near the seat side to avoid blocking access to the rifle case when opened.
Step 2: Securing the Female Buckles to the Rifle Case
The female buckle attaches to the MOLLE or daisy chain webbing on your rifle case using the webbing adapter.
Attaching to MOLLE (Vertical or Horizontal Configuration)
- Remove the webbing adapter from the split bar on the female buckle.
- Slide the webbing adapter up through the laser-cut MOLLE panel.
- Thread the split bar through the loop section to lock the buckle in place.
- Attach the male buckle from the vehicle strap into the secured female buckle.
Alternative Horizontal Mounting:
- For a side-mounted configuration, follow the same process but insert the webbing adapter horizontally through the MOLLE slots.
- Secure using the split bar as before.
Step 3: Attaching to Daisy Chain Webbing
- Remove the webbing adapter from the female buckle.
- Thread it through the daisy chain webbing on the rifle case.
- Reattach the split bar to secure the buckle in place.
- Connect the male buckle from the vehicle strap.
Note: The daisy chain webbing is also where you can attach backpack straps for alternate carry options.
Final Adjustments & Testing
- Ensure all straps are evenly spaced to provide proper support.
- Test the rifle case's accessibility by unzipping it while mounted.
- Adjust the strap tension for a secure yet accessible fit.
If you have any questions about mounting the Vehicle Attachment Kit, feel free to call, chat or email us—we’re happy to help! Also, please make sure to watch through the videos included below!