Holster Hanger Overview and SetupUpdated 5 months ago
 Hey guys, Paul with FHF Gear here to introduce the Holster Hanger, a soft, flexible backer designed for seamless holster carry across all FHF Foundation pieces. Featuring the Blade Tech attachment system, this hanger provides multiple mounting options for your holster, making it compatible with:
- FOB Bino Harness
- Older FHF Harness Models (including the Pro-M)
- Chest Rig
- MCP (Modular Chest Panel)
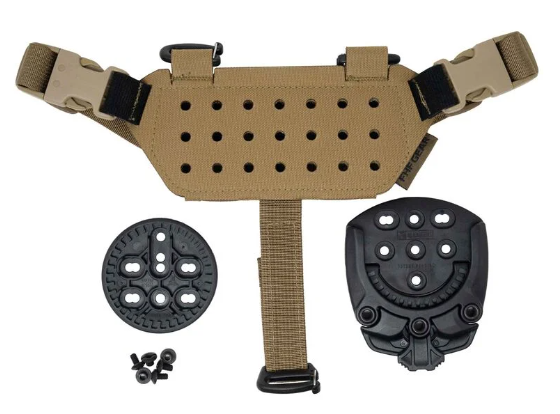
The Holster Hanger comes in two pieces:
- The hanger itself
- The Blade Tech receiver
Since every holster setup is unique, the Blade Tech receiver is not pre-installed. This allows you to customize placement based on your firearm’s balance and personal carry preference. The receiver aligns with laser-cut holes on the hanger, giving you full control over positioning.
The hanger also features Velcro-backed panels for adjustability, letting you fine-tune both side and bottom attachment points to match your preferred draw angle and firearm size.
Seamless Integration with Other FHF Systems
The Holster Hanger is compatible with other Blade Tech attachment systems, allowing you to move your holster between:
- EDC Packs & Satchels
- Pack Belts
- Apex Belt
With this system, you can swap holsters between accessories without ever unholstering your firearm. Whether switching firearms for different activities or moving between belt and pack configurations, this hanger offers unmatched versatility and security.
Holster Hanger Setup Instructions
Step 1: Attaching the Blade Tech Receiver
- Determine the optimal position for your holster on the hanger based on firearm balance and carry preference.
- Align the Blade Tech receiver with the laser-cut holes on the hanger.
- Secure the receiver with the provided screws, ensuring a tight fit.
Step 2: Securing the Holster Hanger to Your Harness
- Open the Velcro-backed panel on the hanger to access the attachment slots.
- Thread the gatekeeper buckles through the hanger’s rear slots for weight distribution and extra security.
- Reinstall the gatekeeper buckles to lock the system in place.
Step 3: Attaching to a Bino Harness
- Locate the lower tabs on your bino harness.
- Use the gatekeeper buckles to attach the hanger to these tabs.
- Secure the front tab using the MOLLE system, threading it through the MOLLE webbing before locking it with the gatekeeper buckle.
- Adjust the front-to-back positioning using the front adjustment piece for a customized fit.
- Use the tri-glides to attach the side straps of the holster hanger to the bino harness side straps.
- Slide the tri-glide adjusters to your preferred tightness and positioning.
Step 4: Final Adjustments & Holster Integration
- Attach your firearm to the holster and secure it in place.
- Use the Blade Tech system to adjust the holster angle for comfortable carry.
- Fine-tune the tension to prevent movement while ensuring comfort.
As always, if you have any questions on our Holster Hanger or the Blade Tech attachment system utilized therein, please don't hesitate to contact our team of Customer Support and Gear Experts--we'd gladly talk you through any questions you may have. Also, please make sure to watch the video included below. Paul, FHF's Founder and Lead Designer will walk you through our Holster Hanger, it's setup, and how it may lend itself well to your particular kit!