General Purpose Pouch Overview and SetupUpdated 4 months ago
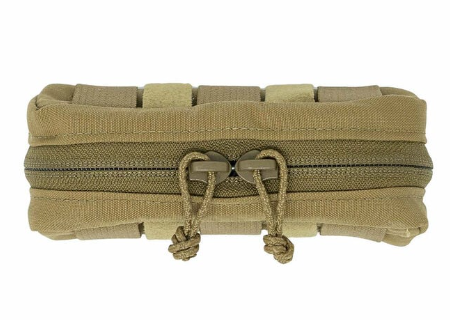 The General Purpose Pouch is a versatile, low-profile storage solution designed to keep essential gear accessible and secure right on your harness.
Key Features:
- Compact Size – Measures 2" x 2" x 6", fitting seamlessly under your harness without adding bulk.
- Multi-Use Storage – Perfect for carrying snacks, a small kill kit, gloves, a Havalon knife, a first aid kit, survival essentials, or a tourniquet for quick access.
- Internal Organization – Equipped with elastic loops for securing small items, lanyard loops for attaching essentials like a GPS, and a loop Velcro field for additional customization.
- MOLLE-Compatible Attachment – Features top and bottom MOLLE webbing for multiple attachment options.
- Secure Mounting – Comes with one-wrap Velcro straps that loop back onto themselves for a firm hold.
This pouch is ideal for hunters, hikers, and outdoor enthusiasts who need a lightweight yet durable storage option without digging through their pack.
General Purpose Pouch Setup Instructions
Installation Options
The General Purpose Pouch can be installed on the bottom or side of your FHF Gear Bino Harness. There are two different attachment methods, depending on which harness model you have:
- Standard Attachment Method – Works with newer FHF Bino Harnesses featuring a laser-cut MOLLE panel on the bottom.
- MOLLE Attachment Strap Method – Required for older FHF Bino Harnesses with MOLLE webbing instead of a laser-cut panel.
Attaching the Pouch to the Bottom of the Bino Harness
For Newer Bino Harnesses (with Laser-Cut MOLLE Panel)
- Open the one-wrap Velcro arms on the General Purpose Pouch.
- Feed the Velcro arms down through the laser-cut slots on the bottom of the bino harness.
- Flip the harness over and continue feeding the Velcro through until it pops out the back.
- Push the pouch flush against the bottom of the bino harness.
- Secure the first Velcro arm by pressing it down firmly.
- Wrap the second Velcro arm over the first to lock it in place.
- Double-check the fit—the pouch should be securely attached without movement.
For Older Bino Harnesses (with MOLLE Webbing on the Bottom)
Take the MOLLE attachment strap and locate the two rectangular openings at the end.
- Slide this strap under all the webbing on top of the General Purpose Pouch.
- Pull the strap through until the end slightly extends beyond the webbing.
- Begin weaving the other end of the strapthrough the MOLLE webbing:
- Go under the first piece of webbing on the bino harness.
- Pass it under the one-wrap Velcro on the pouch.
- Continue weaving in this pattern until you reach the end.
- At the end of the weave, pass the strap through the first rectangular cut, then through the second cut to lock it in place.
- Check the fit—it should be tight and secure on older-style harnesses.
Attaching the Pouch to the Side of the Bino Harness
This works with both new and old harness models.
- Remove the pouch from the bottom attachment if necessary.
- Locate the two slots near the elastic on the side of the bino harness.
- Decide on the zipper orientation—it can face forward or to the side.
- Feed the one-wrap Velcro arms through the side slots.
- Turn the harness around and thread the other end of the Velcro arms through the back.
- Secure the Velcro arms together inside the harness, overlapping them for a snug fit.
Final Check & Adjustments
- Make sure the pouch is tight against the harness.
- Adjust the zipper position based on your preference.
- Test the security by lightly pulling on the pouch—it should stay firmly in place.
Please make sure to watch through the video included below as well. Paul Lewis, FHF's Founder and Lead Designer will talk you through the General Purpose Pouch, what you may potentially be able to use it for, and how to attach it it any of FHF's Foundations!