FOB Bino Harness Overview + Setup InstructionsUpdated 5 months ago
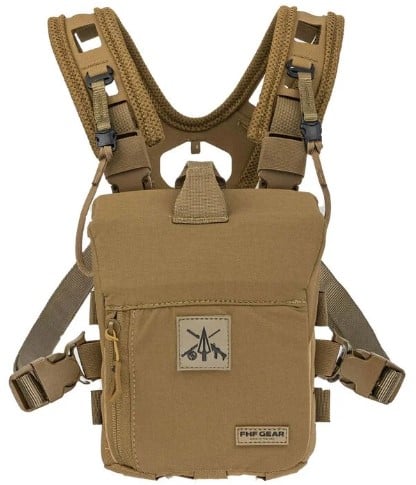
The FOB Bino Harness is a forward-opening, low-profile, and modular system designed to keep your critical gear secure and accessible in the field. Inspired by military Forward Operating Bases, this harness is built for durability, functionality, and adaptability.
Key Features:
- Secure & Silent Access – Rare earth magnets provide easy one-handed operation while keeping your binoculars protected.
- Customizable Fit – The airframe harness features auto-lock buckles for height adjustment, ensuring a high, tight fit across the chest for maximum stability.
- Modular Attachments – Laser-cut MOLLE panels allow for accessory customization, including FHF’s Wind Call Pouch and additional gear.
- All-Day Comfort – Made with air mesh backing for breathability and a squadron laminate harness that resists water absorption.
- Versatile Sizing – Available in Standard (fits most hunting binos) and Large (accommodates up to 15x binos).
- Customizable Foam Inserts – Includes pre-cut foam spacers for optimal bino positioning, with integrated storage slots for batteries or small essentials.
- Adjustable Front Panel – Moldable to accommodate different bino bridge heights and interpupillary distances.
Built to last and designed with purpose, the FOB Bino Harness is a foundation piece for serious outdoor enthusiasts.
FOB Bino Harness Setup Instructions
PLEASE NOTE THAT THE FOB BINO POUCH AND AIRFRAME HARNESS ARE NOW SOLD SEPARATELY (updated as of 4/18/25).
Adjusting the Harness
Your harness comes with the airframe harness, pouch, wind call pouch, and foam inserts. First, adjust the harness so the Y in the back sits high between your shoulder blades—avoid it riding on your neck or too low. The tabs on the back should align just over your shirt’s top seam.
Once the harness is positioned, adjust the pouch height. For a high and tight fit, keep the auto-lock buckles high. For a lower fit, extend the webbing. The elastic keeper on the buckles reduces noise and helps route the webbing—pull it down onto the female buckle, unbuckle, and adjust as needed.
The webbing is routed through laser-cut slits for concealment. To lengthen it, pull the webbing up into the harness and adjust using the auto-lock buckle. Once set, reattach the male-to-female buckle and slide the elastic back over.
Managing Webbing & Bino Hangers
The side harness elastic keeper secures excess webbing—optional based on preference. The bino hangers attach via small metal hooks in sewn-in loops. To attach, remove the lower portion, thread through the bino’s studs (not the rings), and tighten. Reattach to the harness when done.
Setting Up the Pouch & Accessories
Open the pouch to find the wind call pouch and foam shims. The wind call pouch can attach to either side via MOLLE—simply weave through the slits and tuck the tag end underneath the last MOLLE row for a secure fit.
For the binos, use the included shims to adjust their height in the pouch—stack them until the binos sit near the top. Adjust the metal band inside the pouch to fit your bino’s bridge width by bending or straightening it.
Attaching Accessories
To add a range finder, attach it to the side MOLLE by weaving the slits on the pouch with the slits on the range finder. You can reverse placement depending on preference.
For a wing setup, slide it into the webbing loops after removing the side buckle. This gives two attachment points for the wing and one for the harness. Attach the range finder using either MOLLE column—I prefer the inner column for a tighter fit. Tuck excess webbing between the laminate and foam for comfort.
This setup works for other accessories like the E3, Nav pouch, or Rhino pouch. Customize it to your preference. Also, make sure to watch the video created by Paul Lewis, FHF's Founder below! Paul will walk you through the features of the FOB, how to set it up, and lend a bit of insight around a few of his favorite accessories as well!